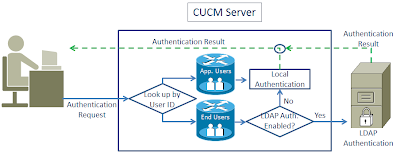
Cisco Unified Presence Server (CUPS) has the capability to retrieve calendar (Exchange) status and populate to clients (CUPC). When your calendar status is "busy" in calendar, CUPC will display your status as "in a meeting".
![]()
To enable this feature, there are server-side configuration (CUPS/Exchange) and client side configuration(CUPC).
CUPC configuration
On CUPC side, you go to "File > Preferences > Status" and put a check mark on "Show me as 'In a Meeting' whenever my Exchange calendar shows me as busy".
![]()
Please note that when multiple 'presence' arrIve, CUPC can only display one of them. The priority, from high to low is: Phone Presence > Calendar Presence > Availability Status.
For example:
You logged into CUPC ==> Availability Status = "Available"
You're on the phone ==> Phone Status = "On the Phone"
Your calendar is busy ==> Calendar Presence = "In a Meeting"
In this scenario, CUPC will display the status as "On the Phone". You won't see "In a Meeting". However, you may move the mouse over a contact (or your self-status) to see all the presence.
In the screenshot below, you'll see the CUPC display its self-status as "On the phone". When you move the mouse over the self-status, you'll see "Online, On the phone, In a meeting" in the tooltip. This is how to explore the "hidden" presence from CUPC.
![]()
![]()
CUPS configuration
The most confusing (instead of difficult) part on CUPS is the SSL/Certificate configuration. CUPS can only talk to Exchange via HTTPS. Why is that?
That is because CUPS use an Exchange "service account" to read everybody's mailbox (calendar). If the communication was not encrypted (SSL), it would pose a threat to information security. A hacker could easily intercept the packets on network and retrieve everybody's (including CEO's) email and calendar.
With that said, here are the requirements on Exchange and CUPS to set up a SSL connection:
1) HTTPS needs to be enabled for OWA (Outlook Web Access)
2) The CA certificates of Exchange need to be trusted by CUPS.
Regarding #1, there's a catch. We'll discuss that in the "Exchange" section below.
Regarding #2, there are two catches -
A) Don't confuse the CA cert with identity cert.
B) Request address has to match certificate.
A) What is a "CA cert" and what is an "identity cert"?
For example, if your Exchange OWA has a certificate to identify itself as "owa.acme.local". This certificate is called "identity cert". Let say, this identity cert was issued by a CA (Certificate Authority) called "my-ca-server.acme.local". On the CA server, it has a certificate to identify itself. We call that cert a "CA cert".
It is the "CA cert" CUPS server needs to trust. In our example above, it's the "my-ca-server.acme.local" certificate needs to be uploaded to CUPS as "Presence Engine-Trust".
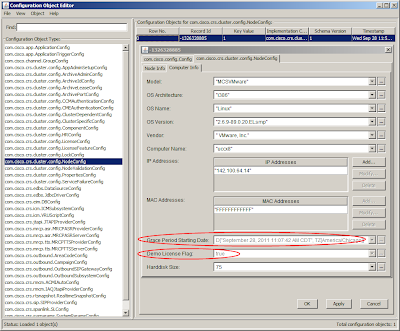
B) When you configure the "Outlook presence gateway" on CUPS, the address you put in there is the address CUPS will use to sent request to Exchange.
For simplicity, quite a few people just put the IP address of Exchange there. This is not going to work with SSL. For security, the request address has to match with the common name in the identity certificate. Usually, the certificate will identity the server in FQDN (e.g. owa.apps.local). Thus, you'll have to configure the same name in presence gateway configuration page.
Please note: I used the word "same name" instead of "FQDN". Because technically, you could configure any name in the certificate. Let's take a look at a couple examples:
Your OWA server IP = 192.168.1.100
Your OWA server FQDN in DNS = owa.apps.local
Example #1: You configured the common name in the OWA cert as "email.apps.local".
This won't work. Because:
If you used "192.168.1.100" in presence gateway configuration, it doesn't match "email.apps.local" in the identify cert.
If you used "owa.apps.local" in presence gateway configuration, it doesn't match "email.apps.local" in the identify cert.
If you used "email.apps.local" in presence gateway configuration, CUPS won't be able to resolve the name, because it's not in DNS.
Or even worse, you don't have DNS configured on CUPS so you can't use any FQDN.
Solution:
1) Add "email.apps.local" to DNS
2) Configure CUPS used DNS (use "set network dns primary" command)
3) Use "email.apps.local" in presence gateway
Example #2
In a lab environment, you may configure the certificate so it identifies the OWA server with common name "192.168.1.100" (though it's not a common practice, it's technically legit).
In this scenario, you may use IP address 192.168.1.100 in presence gateway config.
Whenever you made changes to presence gateway, don't forget to restart Presence Engine service.
Exchange
You don't have to be an Exchange expert. But you should at least know the following:
OWA, WebDAV, Receive-As permission, IIS certificate, CAS/Mailbox roles, authentication methods, Power Shell. (did I say you don't have to be an expert? :) )
OWA
OWA - Outlook Web Access, a web interface to access Exchange emails, calendars, etc. HTTPS needs to be enabled on OWA for CUPS integration to work.
OWA is actually a very useful tool for troubleshooting. For example:
When you tried to access OWA via HTTPS, OWA server will present you a certificate. You may view that certificate from web browser. You should be able to tell what the CA cert is from the web browser.
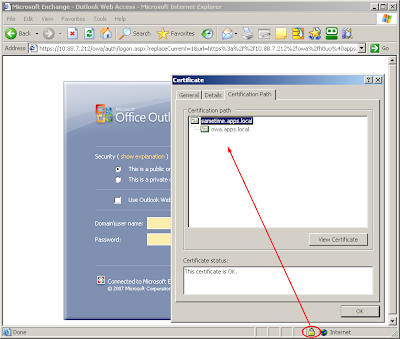
In the screenshot below, you open a web page to OWA. If you double-click the "lock" icon at the bottom of IE, you'll see a certificate viewer window. From the "certification" tab, you'll see the CA cert is "sametime.apps.local". The identity cert is "owa.apps.local".
![]()
Now you know that:
1) You need to upload "sametime.apps.local" cert to CUPS as "Presence Engine - Trust".
2) You need to configure "owa.apps.local" as the "presence gateway" on CUPS > Presence > Presence Gateway.
WebDAV
WebDAV is a protocol (on top of HTTP) to retrieve email/calendar information. See http://en.wikipedia.org/wiki/WebDAV for more details.
CUPS uses WebDAV for calendar integration. Microsoft obsoletes WebDAV on Exchange 2010 and advocates its own protocol EWS (Exchange Web Service). By the time this blog was being written, CUPS doesn't support EWS yet. Which means, CUPS doesn't work with Exchange 2010. I'm not sure if you can have an E2007 CAS in E2010 as a "WebDAV" gateway. I'll test it later.
Though WebDAV sits on HTTP/HTTPS, it's different from OWA. Don't assume WebDAV is working just because OWA was working.
Up to Exchange 2007, WebDAV was enabled by default. You don't have to explicitly enable it. Some people reported that WebDAV was not installed/enabled on E2007 with Win2008. This is not true. The "WebDAV Publishing" in screenshot below has nothing to do with CUPS integration. It's OK to leave it uninstalled.
![]()
Since E2007, Microsoft change the OWA URL from /exchange to /owa, but WebDAV URL stays the same (/exchange). This caused more confusions in troubleshooting.
When you troubleshoot CUPS calendar integration, you'll see CUPS always request to URL /exchange, which is the WebDAV URL. This is right and expected.
If you tried to "test" it by typing "https://owa.acme.local/exchange", you'll be redirected to "https://owa.acme.local/owa". This is also right and expected. For more details, please see: http://msexchangeteam.com/archive/2007/02/07/434523.aspx
The point is: there's no easy way to tell if WebDAV is working. But it's easy to tell if WebDAV is NOT working.
If you typed "https://owa.acme.local/exchange" and got some error like "401 unauthorized" or "503 service unavailable", WebDAV is more than likely not working. Though regular OWA might be working fine at this point.
If you got "401 unauthorized", you may take a look at http://msexchangeteam.com/archive/2008/02/01/447989.aspx. Default settings should work. If it doesn't work, most likely your authentication was expecting username in a different format. e.g. "domain\user" instead of "user".
If you got "503 service unavailable" or "500 internal server error", please make sure "ISAPI Extensions" is installed on mailbox server. See screenshot below. This usually happens if mailbox server and CAS are on two different servers.
![]() Certificate
Certificate
OWA/WebDAV relies on IIS to server HTTP request. It's IIS that presents certificate to SSL client.
By default, when you installed IIS, it'll generate a self-signed certificate. Unfortunately, this self-signed certificate doesn't work with CUPS, because it doesn't contain CA bit in its extension. Below is an example of the certificate that HAS the CA bit:
![]()
If your CA cert does not have CA bit, CUPS won't trust it. This is per RFC 2459. Don't blame Cisco on that.
Solution? Get a certificate from a CA (either external or internal) or use "makecert.exe" to create a self-signed cert with CA bit (see my book for details).
Receive-As Permission
In order to see everybody's calendar, CUPS needs an account with this permission. So the FAQ is: what's the minimum permission required?
The minimum permission required is "Receive-As" on the end user's mailbox.
Cisco documents said you need "View Only Administrator". That's not true. All you need is "Receive-As" permission on the end user's mailbox. Not more, not less.
How do we assign "Receive-As" permission to the account? I would recommend use Exchange Management Shell (command line).
Let say, in Active Directory, the service account used by CUPS is called "cupsexch". The end user account is called "JDoe" (full name: John Doe). The following command give "cupsexch" Receive-As permission on John Doe's mailbox:
In Exchange, the "container" for mailboxes is "Mailbox Database". The container for "Mailbox Databases" is "Storage Group". You may have multiple databases in a storage group. And you may have multiple storage groups in your Exchange environment.
![]()
You may assign permission at different levels:
End User Mailbox
Mailbox Database
Storage Group
Since "Storage Group" is the highest level of "container", we usually assign permissions on storage group level. Permissions would populate down to end user mailboxes. This "population" takes some time (from 30 minutes to hours).
The command to assign permission on "First Storage Group" is as below:
The command to verify permission is as below:
If you got nothing, that means "no permission". If you assigned the permission on higher containers, it might not have flowed down yet.
If the permission has been populated, you should see something like the screenshot below:
![]()
"AccessRights = {FullAccess}" means "cups7exch" account has permission to read "John Doe's" mailbox.
"Is Inhereited = True" means this permission was inherited from some higher level containers.
This is the only reliable way to test permissions.
Cisco documents described a test method which use OWA to test the URL "https://owa-address/exchange/some_user/calendar" with the service account. This method may or may not work depending on other permissions you configured for the service account. For example, if you are like me to give minimum permissions, Cisco test method would yield a "no permission" page as below. However, CUPS calendar works just fine with the "minimum permission".
![]()
Troubleshooting
If calendar integration doesn't work, "Presence Engine" (PE) logs are the only traces we need.
Ideally, we want the logs since PE started. Thus if you could, do the following:
1) Restart PE
2) Wait unti PE started and stabilized
3) Log into CUPC
4) Collect PE logs since the time of restart
5) Use WinGrep to search for keyword "owa". It'll give you all message regarding OWA transactions.
Following are some common problems:
"Certificate not trusted"
This could be caused by the following:
"440 Login Timeout"
When FBA (Form-Based Authentication) was enabled, you'll see one "440 login timeout" in PE log for each transaction. This is normal. If you keep getting "440 login timeout", it usually indicates an authentication issue.
To reveal the nature of the problem, it's recommended to change "Form-Based Authentication" to "Standard Authentication" on "/Exchange" virtual directory on OWA. See screenshot below:
![]()
Changing this will not change the way or feel of regular OWA logon. It's just change the authentication method for WebDAV. (you'll need to reset IIS by using command "iisreset /noforce")
"401 Unauthorized"
This is usually caused by permission issue. See "Receive-As" permission configuration above for testing method.
Another testing method would be configuring an end user's credential on presence gateway. An end user's credential would definitely have permission on his own mailbox. If you log in to CUPC with that end user account, calendar integration should work. This is a good way to do "problem isolation".
To be continued...

To enable this feature, there are server-side configuration (CUPS/Exchange) and client side configuration(CUPC).
CUPC configuration
On CUPC side, you go to "File > Preferences > Status" and put a check mark on "Show me as 'In a Meeting' whenever my Exchange calendar shows me as busy".

Please note that when multiple 'presence' arrIve, CUPC can only display one of them. The priority, from high to low is: Phone Presence > Calendar Presence > Availability Status.
For example:
You logged into CUPC ==> Availability Status = "Available"
You're on the phone ==> Phone Status = "On the Phone"
Your calendar is busy ==> Calendar Presence = "In a Meeting"
In this scenario, CUPC will display the status as "On the Phone". You won't see "In a Meeting". However, you may move the mouse over a contact (or your self-status) to see all the presence.
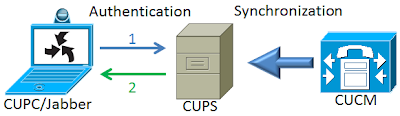
In the screenshot below, you'll see the CUPC display its self-status as "On the phone". When you move the mouse over the self-status, you'll see "Online, On the phone, In a meeting" in the tooltip. This is how to explore the "hidden" presence from CUPC.


CUPS configuration
The most confusing (instead of difficult) part on CUPS is the SSL/Certificate configuration. CUPS can only talk to Exchange via HTTPS. Why is that?
That is because CUPS use an Exchange "service account" to read everybody's mailbox (calendar). If the communication was not encrypted (SSL), it would pose a threat to information security. A hacker could easily intercept the packets on network and retrieve everybody's (including CEO's) email and calendar.
With that said, here are the requirements on Exchange and CUPS to set up a SSL connection:
1) HTTPS needs to be enabled for OWA (Outlook Web Access)
2) The CA certificates of Exchange need to be trusted by CUPS.
Regarding #1, there's a catch. We'll discuss that in the "Exchange" section below.
Regarding #2, there are two catches -
A) Don't confuse the CA cert with identity cert.
B) Request address has to match certificate.
A) What is a "CA cert" and what is an "identity cert"?
For example, if your Exchange OWA has a certificate to identify itself as "owa.acme.local". This certificate is called "identity cert". Let say, this identity cert was issued by a CA (Certificate Authority) called "my-ca-server.acme.local". On the CA server, it has a certificate to identify itself. We call that cert a "CA cert".
It is the "CA cert" CUPS server needs to trust. In our example above, it's the "my-ca-server.acme.local" certificate needs to be uploaded to CUPS as "Presence Engine-Trust".
B) When you configure the "Outlook presence gateway" on CUPS, the address you put in there is the address CUPS will use to sent request to Exchange.
For simplicity, quite a few people just put the IP address of Exchange there. This is not going to work with SSL. For security, the request address has to match with the common name in the identity certificate. Usually, the certificate will identity the server in FQDN (e.g. owa.apps.local). Thus, you'll have to configure the same name in presence gateway configuration page.
Please note: I used the word "same name" instead of "FQDN". Because technically, you could configure any name in the certificate. Let's take a look at a couple examples:
Your OWA server IP = 192.168.1.100
Your OWA server FQDN in DNS = owa.apps.local
Example #1: You configured the common name in the OWA cert as "email.apps.local".
This won't work. Because:
If you used "192.168.1.100" in presence gateway configuration, it doesn't match "email.apps.local" in the identify cert.
If you used "owa.apps.local" in presence gateway configuration, it doesn't match "email.apps.local" in the identify cert.
If you used "email.apps.local" in presence gateway configuration, CUPS won't be able to resolve the name, because it's not in DNS.
Or even worse, you don't have DNS configured on CUPS so you can't use any FQDN.
Solution:
1) Add "email.apps.local" to DNS
2) Configure CUPS used DNS (use "set network dns primary" command)
3) Use "email.apps.local" in presence gateway
Example #2
In a lab environment, you may configure the certificate so it identifies the OWA server with common name "192.168.1.100" (though it's not a common practice, it's technically legit).
In this scenario, you may use IP address 192.168.1.100 in presence gateway config.
Whenever you made changes to presence gateway, don't forget to restart Presence Engine service.
Exchange
You don't have to be an Exchange expert. But you should at least know the following:
OWA, WebDAV, Receive-As permission, IIS certificate, CAS/Mailbox roles, authentication methods, Power Shell. (did I say you don't have to be an expert? :) )
OWA
OWA - Outlook Web Access, a web interface to access Exchange emails, calendars, etc. HTTPS needs to be enabled on OWA for CUPS integration to work.
OWA is actually a very useful tool for troubleshooting. For example:
When you tried to access OWA via HTTPS, OWA server will present you a certificate. You may view that certificate from web browser. You should be able to tell what the CA cert is from the web browser.
In the screenshot below, you open a web page to OWA. If you double-click the "lock" icon at the bottom of IE, you'll see a certificate viewer window. From the "certification" tab, you'll see the CA cert is "sametime.apps.local". The identity cert is "owa.apps.local".
Now you know that:
1) You need to upload "sametime.apps.local" cert to CUPS as "Presence Engine - Trust".
2) You need to configure "owa.apps.local" as the "presence gateway" on CUPS > Presence > Presence Gateway.
WebDAV
WebDAV is a protocol (on top of HTTP) to retrieve email/calendar information. See http://en.wikipedia.org/wiki/WebDAV for more details.
CUPS uses WebDAV for calendar integration. Microsoft obsoletes WebDAV on Exchange 2010 and advocates its own protocol EWS (Exchange Web Service). By the time this blog was being written, CUPS doesn't support EWS yet. Which means, CUPS doesn't work with Exchange 2010. I'm not sure if you can have an E2007 CAS in E2010 as a "WebDAV" gateway. I'll test it later.
Though WebDAV sits on HTTP/HTTPS, it's different from OWA. Don't assume WebDAV is working just because OWA was working.
Up to Exchange 2007, WebDAV was enabled by default. You don't have to explicitly enable it. Some people reported that WebDAV was not installed/enabled on E2007 with Win2008. This is not true. The "WebDAV Publishing" in screenshot below has nothing to do with CUPS integration. It's OK to leave it uninstalled.

Since E2007, Microsoft change the OWA URL from /exchange to /owa, but WebDAV URL stays the same (/exchange). This caused more confusions in troubleshooting.
When you troubleshoot CUPS calendar integration, you'll see CUPS always request to URL /exchange, which is the WebDAV URL. This is right and expected.
If you tried to "test" it by typing "https://owa.acme.local/exchange", you'll be redirected to "https://owa.acme.local/owa". This is also right and expected. For more details, please see: http://msexchangeteam.com/archive/2007/02/07/434523.aspx
The point is: there's no easy way to tell if WebDAV is working. But it's easy to tell if WebDAV is NOT working.
If you typed "https://owa.acme.local/exchange" and got some error like "401 unauthorized" or "503 service unavailable", WebDAV is more than likely not working. Though regular OWA might be working fine at this point.
If you got "401 unauthorized", you may take a look at http://msexchangeteam.com/archive/2008/02/01/447989.aspx. Default settings should work. If it doesn't work, most likely your authentication was expecting username in a different format. e.g. "domain\user" instead of "user".
If you got "503 service unavailable" or "500 internal server error", please make sure "ISAPI Extensions" is installed on mailbox server. See screenshot below. This usually happens if mailbox server and CAS are on two different servers.
 Certificate
OWA/WebDAV relies on IIS to server HTTP request. It's IIS that presents certificate to SSL client.
By default, when you installed IIS, it'll generate a self-signed certificate. Unfortunately, this self-signed certificate doesn't work with CUPS, because it doesn't contain CA bit in its extension. Below is an example of the certificate that HAS the CA bit:

If your CA cert does not have CA bit, CUPS won't trust it. This is per RFC 2459. Don't blame Cisco on that.
Solution? Get a certificate from a CA (either external or internal) or use "makecert.exe" to create a self-signed cert with CA bit (see my book for details).
Receive-As Permission
In order to see everybody's calendar, CUPS needs an account with this permission. So the FAQ is: what's the minimum permission required?
The minimum permission required is "Receive-As" on the end user's mailbox.
Cisco documents said you need "View Only Administrator". That's not true. All you need is "Receive-As" permission on the end user's mailbox. Not more, not less.
How do we assign "Receive-As" permission to the account? I would recommend use Exchange Management Shell (command line).
Let say, in Active Directory, the service account used by CUPS is called "cupsexch". The end user account is called "JDoe" (full name: John Doe). The following command give "cupsexch" Receive-As permission on John Doe's mailbox:
Add-ADPermission -Identity "John Doe" -User cupsexch -ExtendedRights Receive-AsOf course, you're not going to repeat this command for 1000 users. The better way to do it is to assign permission on a "container" that contains the end users' mailboxes.
In Exchange, the "container" for mailboxes is "Mailbox Database". The container for "Mailbox Databases" is "Storage Group". You may have multiple databases in a storage group. And you may have multiple storage groups in your Exchange environment.

You may assign permission at different levels:
End User Mailbox
Mailbox Database
Storage Group
Since "Storage Group" is the highest level of "container", we usually assign permissions on storage group level. Permissions would populate down to end user mailboxes. This "population" takes some time (from 30 minutes to hours).
The command to assign permission on "First Storage Group" is as below:
Add-ADPermission -Identity "First Storage Group" -User cupsexch -ExtendedRights Receive-AsWhat if you have multiple storage groups and want to automate the process? You may use the command below:
Get-StorageGroup | add-ADPermission –user cupsexch -ExtendedRights Receive-As"Get-StorageGroup" command will get all storage group names from system and feed the names to "Add-ADPermission" command.
The command to verify permission is as below:
Get-MailboxPermission jdoe -user cupsexch | Format-Table -autosizeThis command will display "cupsexch" permission on jdoe's mailbox. Anything after the pipe sign (|) is just for formatting purpose.
If you got nothing, that means "no permission". If you assigned the permission on higher containers, it might not have flowed down yet.
If the permission has been populated, you should see something like the screenshot below:

"AccessRights = {FullAccess}" means "cups7exch" account has permission to read "John Doe's" mailbox.
"Is Inhereited = True" means this permission was inherited from some higher level containers.
This is the only reliable way to test permissions.
Cisco documents described a test method which use OWA to test the URL "https://owa-address/exchange/some_user/calendar" with the service account. This method may or may not work depending on other permissions you configured for the service account. For example, if you are like me to give minimum permissions, Cisco test method would yield a "no permission" page as below. However, CUPS calendar works just fine with the "minimum permission".

Troubleshooting
If calendar integration doesn't work, "Presence Engine" (PE) logs are the only traces we need.
Ideally, we want the logs since PE started. Thus if you could, do the following:
1) Restart PE
2) Wait unti PE started and stabilized
3) Log into CUPC
4) Collect PE logs since the time of restart
5) Use WinGrep to search for keyword "owa". It'll give you all message regarding OWA transactions.
Following are some common problems:
"Certificate not trusted"
This could be caused by the following:
- The name configured in "CUPS > Presence > Presence Gateway" does not match with the name in identity certificate. (e.g. IP address vs. FQDN)
- CA certificate was not imported as "Presence Engine - Trust". If there are multiple CAs in the certificate chain, all of them need to be imported.
- CA bit was not set (usually happens on IIS self-signed certificate)
"440 Login Timeout"
When FBA (Form-Based Authentication) was enabled, you'll see one "440 login timeout" in PE log for each transaction. This is normal. If you keep getting "440 login timeout", it usually indicates an authentication issue.
To reveal the nature of the problem, it's recommended to change "Form-Based Authentication" to "Standard Authentication" on "/Exchange" virtual directory on OWA. See screenshot below:

Changing this will not change the way or feel of regular OWA logon. It's just change the authentication method for WebDAV. (you'll need to reset IIS by using command "iisreset /noforce")
"401 Unauthorized"
This is usually caused by permission issue. See "Receive-As" permission configuration above for testing method.
Another testing method would be configuring an end user's credential on presence gateway. An end user's credential would definitely have permission on his own mailbox. If you log in to CUPC with that end user account, calendar integration should work. This is a good way to do "problem isolation".
To be continued...