For whatever reason, Cisco only post "non-bootable" ISO images on CCO for download. In some urgent situations, you might need a bootable disc to recover the system (or your client/boss would shoot you in the head). Here's the procedure to make a non-bootable ISO image bootable.
Before you continue, be aware that this procedure is NOT approved by Cisco. Neither Cisco nor I will be responsible for any loss caused by this.
Any bootable disc has to follow "El Torito" specification. No exception for Cisco discs. The only difference between a bootable disc and non-bootable disc is the "boot sector". Thus the solution is very simple - extract the boot sector from a bootable disc and inject it into a non-bootable disc.
The boot sector is a very small file (usually less than 10k). And the boot sector is usually content independent (i.e. you may extract the boot sector from CUCM 7.1.3 and inject it into 7.1.5). You may save the boot sector on your USB thumb drive and keep it handy.
To extract/inject the boot sector, you need some disc image tools like UltraISO. (You may also use other ISO tools with similar features)
Step 1: Get the boot file
There are two ways to get a boot file - extract from a bootable DVD's boot sector, or extract from the DVD's file system (regardless bootable or not).
Option 1: Extract the boot sector from a bootable DVD
Put a bootable CUCM disc into the DVD drive and launch UltraISO. Go to menu "Bootable > Extract Boot File from CD/DVD..."
![]()
Save the file to your hard drive as a "boot info file" (bif). In our example, we call it "boot.bif"
![]()
If you couldn't find a bootable DVD, you may also get the file from the non-bootable DVD itself (yes, the file was there. It's just not at the boot sector).
Option 2: Extract from DVD's file system (regardless bootable or not)
The boot file is available on any CUCM DVD, regardless bootable or not. It is located in the "isolinux" folder. File name is isolinux.bin.
![]()
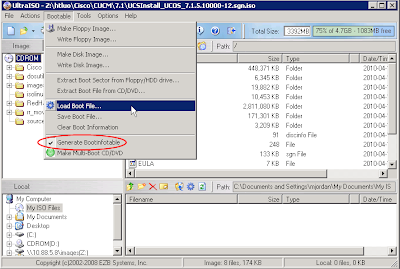
Step 2: Inject the boot file
Open the non-bootable image in UltraISO. Go to menu "Bootable". Make sure "Generate Bootinfotable" was checked. Then choose "Load Boot File...".
![]()
Choose the boot file we saved before (boot.bif or isolinux.bin).
![]()
Note that the image type changed to "Bootable".
![]() Now, you may go to "File > Save As" to save the bootable image to an ISO file. Then you may burn the ISO to a disc with your favorite disc burner software.
Now, you may go to "File > Save As" to save the bootable image to an ISO file. Then you may burn the ISO to a disc with your favorite disc burner software.
Before you continue, be aware that this procedure is NOT approved by Cisco. Neither Cisco nor I will be responsible for any loss caused by this.
Any bootable disc has to follow "El Torito" specification. No exception for Cisco discs. The only difference between a bootable disc and non-bootable disc is the "boot sector". Thus the solution is very simple - extract the boot sector from a bootable disc and inject it into a non-bootable disc.
The boot sector is a very small file (usually less than 10k). And the boot sector is usually content independent (i.e. you may extract the boot sector from CUCM 7.1.3 and inject it into 7.1.5). You may save the boot sector on your USB thumb drive and keep it handy.
To extract/inject the boot sector, you need some disc image tools like UltraISO. (You may also use other ISO tools with similar features)
Step 1: Get the boot file
There are two ways to get a boot file - extract from a bootable DVD's boot sector, or extract from the DVD's file system (regardless bootable or not).
Option 1: Extract the boot sector from a bootable DVD
Put a bootable CUCM disc into the DVD drive and launch UltraISO. Go to menu "Bootable > Extract Boot File from CD/DVD..."

Save the file to your hard drive as a "boot info file" (bif). In our example, we call it "boot.bif"

If you couldn't find a bootable DVD, you may also get the file from the non-bootable DVD itself (yes, the file was there. It's just not at the boot sector).
Option 2: Extract from DVD's file system (regardless bootable or not)
The boot file is available on any CUCM DVD, regardless bootable or not. It is located in the "isolinux" folder. File name is isolinux.bin.

Step 2: Inject the boot file
Open the non-bootable image in UltraISO. Go to menu "Bootable". Make sure "Generate Bootinfotable" was checked. Then choose "Load Boot File...".
Choose the boot file we saved before (boot.bif or isolinux.bin).

Note that the image type changed to "Bootable".
 Now, you may go to "File > Save As" to save the bootable image to an ISO file. Then you may burn the ISO to a disc with your favorite disc burner software.